Looking for clear, practical insulation and drywall guidance you can trust? Our Insulation & Drywall Guides break down the essentials—from choosing the right insulation (batt, blown-in, spray foam, or rigid foam) to planning drywall layouts, fastening schedules, and achieving smooth seams. Whether you’re upgrading comfort, improving energy efficiency, or reducing noise, you’ll find straightforward tips that help you avoid common mistakes like gaps, compression, improper vapor control, and uneven finishing. Use these resources to compare materials, understand R-values, and follow best practices for safer, cleaner, more durable results in basements, attics, garages, and new construction.
Welcome to our Insulation & Drywall Guides—a practical learning hub designed to help homeowners, builders, and remodelers make confident decisions. If you’re searching for an insulation guide, a drywall guide, or a quick answer to “what should I use here?”, you’re in the right place.
Insulation Basics: What to Know Before You Buy
Choosing insulation isn’t just about cost—it’s about performance, comfort, and moisture control. Start with the target R-value for your climate and the specific area (attic, walls, crawl space, basement). Then select a material that fits the cavity depth and job conditions.
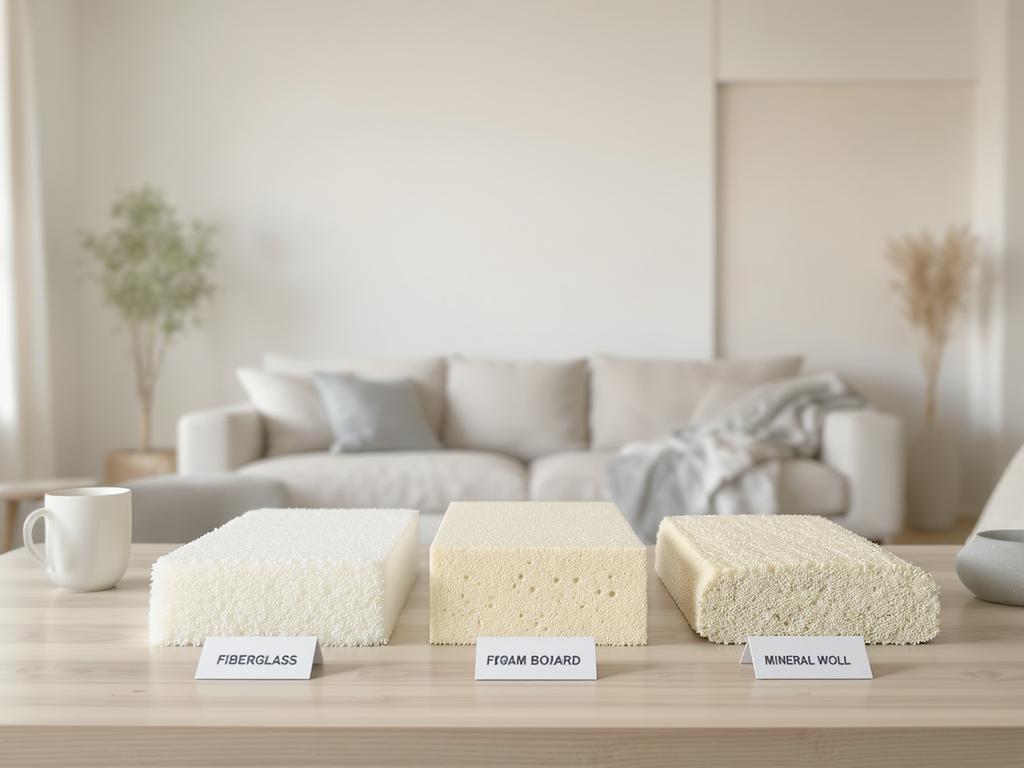
Batt insulation: affordable and common for walls; install carefully to avoid gaps and compression.
Blown-in insulation: great for attics and hard-to-reach spaces; helps fill irregular cavities.
Spray foam insulation: air-sealing plus insulation; ideal for rim joists and complex framing.
Rigid foam board: useful for continuous insulation and reducing thermal bridging.
Pro tip: insulation performs best when it’s continuous and snug—no voids, no shortcuts. Air sealing (around penetrations, top plates, and rim joists) often delivers major comfort gains.
Drywall Planning: Cleaner Installations Start on Paper
Drywall results depend on layout, fastening, and finishing. Before hanging sheets, map out seams, back blocking, and cutouts for outlets and fixtures. Good planning reduces butt joints and speeds up taping.
Pick the right board: standard drywall, moisture-resistant drywall for damp areas, or fire-rated drywall where required.
Use proper fasteners and spacing to prevent pops and sagging.
Confirm framing is straight; shim or plane as needed for flat walls.
These guides focus on best practices that lead to stronger, smoother walls and ceilings—without wasted material or rework.
Vapor Control, Moisture Management & Air Sealing
One of the most searched topics in any insulation guide is vapor control. The right approach depends on climate, assembly type, and whether your wall can dry to one side. In many cases, the biggest win is not a plastic sheet—it’s air sealing. Air leaks carry moisture into cavities, which can lead to condensation, odors, and long-term damage.
Air seal first: seal top plates, bottom plates, plumbing/electrical penetrations, and rim joists.
Choose the right facing: kraft-faced batts may act as a vapor retarder in certain assemblies.
Basements and crawl spaces: prioritize moisture control, drainage, and the correct insulation type for masonry/concrete conditions.
If you’re upgrading insulation for comfort, also consider soundproofing. Mineral wool and dense fiberglass can reduce airborne noise, especially when paired with resilient channels or sound-damping assemblies.
How to Install Insulation: Common Mistakes to Avoid
Even premium materials won’t perform if installed poorly. Our installation guidance emphasizes details that impact real-world results.
No compression: batts should fully loft; compressed insulation loses R-value.
No gaps: cut around wires and pipes; split batts to fit behind utilities.
Protect ventilation paths: use baffles in attics to keep soffit-to-ridge airflow open.
Confirm coverage: blown-in projects should meet depth markers consistently.
Whether you’re insulating an attic for energy savings or walls for year-round comfort, installation quality is the difference between “it should work” and “it actually works.”
Drywall Hanging Guide: Fast, Flat, and Durable
A solid drywall guide starts with sheet placement and fastening. For walls, minimize seams where light will highlight imperfections. For ceilings, use the proper thickness and framing spacing to prevent sagging. If you’re working in a garage, utility room, or multi-family setting, verify any required fire-rated assemblies before you begin.
Layout matters: stagger seams and reduce butt joints when possible.
Corner strength: use corner bead where appropriate for durability and crisp lines.
Drywall Finishing: Taping, Mudding, and Smooth Results
Finishing is where projects often slow down. The best results come from thin, even coats and patience between sanding and re-coating. Use the right tape (paper or fiberglass mesh) for the right situation, keep tools clean, and apply consistent pressure for feathered edges.
Joint compound selection: setting-type compounds for repairs; lightweight for finishing when appropriate.
Multiple thin coats: smoother than one heavy coat and easier to sand.
Lighting check: use raking light to spot ridges before primer.
Explore our guides to compare insulation types, understand R-values, plan drywall installs, and follow proven finishing methods. If you’re researching insulation and drywall for a remodel, new build, or energy-efficiency upgrade, these resources are built to help you make informed decisions and achieve professional-grade results.
 HI 58° LO 56°